HOME

    Social Items

Showing posts with label Pectoral exercise. Show all posts

Last Updated: September 2026 | Reading Time: 12 minutes | Expert Reviewed

Quick Answer: Intermittent fasting (IF) is an eating pattern that cycles between periods of fasting and eating. The most popular method is 16/8 (16 hours fasting, 8 hours eating), which can help you lose weight and preserve muscle mass when paired with a balanced diet.

If you've been struggling with stubborn belly fat, low energy, or confusing diet advice, you're not alone. Intermittent fasting has grown into one of the most widely discussed eating strategies worldwide, and a major review published in the New England Journal of Medicine outlined a wide range of potential health benefits backed by decades of animal and human research.

But here's the problem: most "guides" online are either too simplistic or filled with outdated or exaggerated claims. This article is different. We've combined peer-reviewed research and real-world practicality to give you an honest, actionable guide — including where the science is strong, and where it's still debated.

Complete guide to intermittent fasting for beginners - lose fat and build muscle with 16/8 method

What Is Intermittent Fasting? (The Science Explained Simply)

Intermittent fasting isn't a diet—it's an eating pattern. Instead of focusing on what you eat, IF focuses on when you eat.

Here's what happens in your body during a fast:

  • 0-4 hours: Your body digests and absorbs nutrients from your last meal.
  • 4-12 hours: Blood sugar and insulin levels begin to drop.
  • 12-18 hours: Your body increasingly shifts toward burning stored fat for energy.
  • 18-24 hours: Autophagy activity increases—your cells begin a "cleanup" process.
  • 24+ hours: Human growth hormone (HGH) levels can rise substantially in some studies.
💡 Key Fact: Multiple clinical studies link intermittent fasting to improved insulin sensitivity, though the size of the benefit varies by individual, fasting method, and how it's combined with diet quality.

The 5 Most Popular Intermittent Fasting Methods (Ranked by Difficulty)

1. The 16/8 Method (Leangains Protocol) - BEST FOR BEGINNERS

How it works: Fast for 16 hours, eat during an 8-hour window (e.g., 12 PM - 8 PM)
Best for: Beginners, muscle building, sustainable weight loss
Difficulty: ⭐ (Easy to moderate)

2. The 5:2 Diet (Modified Fasting)

How it works: Eat normally 5 days, restrict to 500-600 calories on 2 non-consecutive days.
Best for: People who prefer flexibility.
Difficulty: ⭐⭐⭐ (Moderate)

3. Eat-Stop-Eat (24-Hour Fast)

How it works: Fast for a full 24 hours once or twice per week.
Best for: Advanced practitioners.
Difficulty: ⭐⭐⭐⭐ (Challenging)

4. Alternate-Day Fasting

How it works: Alternate between fasting days and eating days.
Best for: Significant weight loss goals, under guidance.
Difficulty: ⭐⭐⭐⭐⭐ (Very challenging)

5. OMAD (One Meal A Day)

How it works: Eat all your calories in a single 1-hour window.
Best for: Advanced users only.
Difficulty: ⭐⭐⭐⭐⭐ (Very challenging)

📊 Intermittent Fasting Methods Comparison Table

Method Fasting Window Eating Window Best For Difficulty
16/8 16 hours 8 hours Beginners Easy
5:2 2 days/week 5 days normal Flexibility Moderate
Eat-Stop-Eat 24 hours Normal eating Advanced Hard
OMAD 23 hours 1 hour Experts Very Hard

How to Start Intermittent Fasting: A Step-by-Step Guide

Step 1: Choose Your Method (Start with 16/8)

If you're new to fasting, the 16/8 method is your best starting point. It's sustainable, flexible, and fits easily into most lifestyles.

Step 2: Pick Your Eating Window

  • 12 PM - 8 PM: Most popular (skip breakfast, eat lunch and dinner).
  • 10 AM - 6 PM: Early eater (eat breakfast and lunch, skip dinner).
  • 2 PM - 10 PM: Night owl (late lunch and dinner).

Step 3: Stay Hydrated During Your Fast

  • ✅ Water (plain or sparkling)
  • ✅ Black coffee (no sugar, no milk)
  • ✅ Green tea or herbal tea (unsweetened)
  • ❌ NO calories (this breaks your fast)

Step 4: Break Your Fast Gently

Don't binge when your eating window opens. Start with:

  • A small protein-rich meal (eggs, chicken, Greek yogurt).
  • Healthy fats (avocado, nuts, olive oil).
  • Complex carbs (brown rice, sweet potatoes, quinoa).
🎯 Want to know your exact daily calorie needs for this plan?

Intermittent Fasting Meal Plan: What to Eat (and Avoid)

✅ Foods to Eat During Your Eating Window

  • High-Quality Proteins: Chicken breast, turkey, lean beef, fish, eggs, Greek yogurt, tofu.
  • Healthy Fats: Avocados, olive oil, coconut oil, nuts (almonds, walnuts), seeds (chia, flax).
  • Complex Carbohydrates: Brown rice, quinoa, oats, sweet potatoes, whole grain bread, legumes.
  • Fruits and Vegetables: Leafy greens, broccoli, berries, apples, citrus.

❌ Foods to Avoid

  • Sugary drinks (soda, fruit juice, energy drinks).
  • Processed foods (chips, cookies, candy).
  • Refined carbs (white bread, pastries).
  • Fried foods and excessive alcohol.

Intermittent Fasting Benefits: What Science Actually Says

  • Weight Loss: Multiple studies link intermittent fasting to meaningful weight loss over several weeks, with a notable share coming from visceral (belly) fat — especially when combined with a modest calorie deficit.
  • Insulin Sensitivity: Several trials report improved insulin sensitivity with fasting, which may help lower long-term diabetes risk, though results vary between studies.
  • Heart Health: Some research links fasting to improvements in blood pressure, cholesterol, and inflammatory markers.
  • Cellular Repair (Autophagy): Fasting periods appear to activate autophagy, a cellular "cleanup" process studied for its potential role in healthy aging.
⚖️ A Balanced Look at the Evidence: A large 2025 review of 99 clinical trials published in The BMJ found that daily time-restricted eating (like 16/8) did not clearly outperform simply maintaining a consistent calorie deficit. In other words, 16/8 isn't magic — its real advantage for many people is that the schedule is easier to stick to than traditional calorie counting, which matters a lot for long-term success.

⚠️ Side Effects and How to Avoid Them

  • Hunger and cravings: Normal during the first 1-2 weeks. Drink water or black coffee.
  • Headaches: Often caused by dehydration. Add a pinch of salt to your water.
  • Fatigue: Ensure you're eating enough calories during your eating window.
  • Digestive issues: Increase fiber and water intake.

Note: Consult your doctor before starting if you are pregnant, have a history of eating disorders, are underweight, or have type 1 diabetes.

Frequently Asked Questions (FAQ)

How long does it take to see results?

Most people notice initial changes (reduced bloating, increased energy) within 1-2 weeks. Visible fat loss typically appears after 3-4 weeks. Significant body composition changes take 8-12 weeks.

Can I drink coffee during my fast?

Yes! Black coffee (without sugar, milk, or cream) is perfectly fine. It can suppress appetite and boost metabolism. Limit to 3-4 cups per day.

Will intermittent fasting cause muscle loss?

Research generally suggests IF can preserve muscle mass reasonably well compared to traditional calorie restriction, especially when combined with resistance training and adequate protein intake (0.8-1g per pound of body weight).

Is intermittent fasting safe for women?

Generally yes, but women may need to start more gradually (14/10 instead of 16/8) due to hormonal differences. Listen to your body and adjust accordingly.

The Bottom Line: Should You Try It?

Intermittent fasting is a practical, well-studied strategy that can help many people manage their weight and build better eating habits. It's not a magic bullet — the latest large-scale evidence suggests it works mainly by making calorie control easier to stick to, not through some unique metabolic advantage — but for people who struggle with traditional dieting, that alone can be a game-changer.

Our recommendation: Start with the 16/8 method, be consistent for at least 4 weeks, use our free calorie calculator above, and combine IF with resistance training for the best body composition results.

Intermittent Fasting for Beginners: The Complete 2026 Guide to Lose Fat and Build Muscle

Gironda Dips: The Complete Guide to Vince Gironda's Chest-Sculpting Technique

Last Updated: September 2026 | Reading Time: 8 minutes

Quick Answer: Gironda dips are a wide-grip, forward-leaning dip variation created by legendary bodybuilding coach Vince Gironda specifically to build a classic, wide chest shape — rather than the "unsightly" round look he felt standard dips produced. The key differences from a normal dip: a wider bar spacing, a deeply rounded back, and chin tucked to chest throughout the movement.

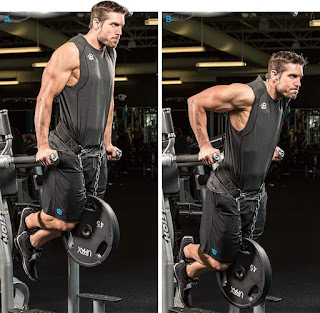
Gironda dips starting position - wide grip chest dip variation demonstration

Who Was Vince Gironda, and Why Did He Invent This Exercise?

Vince Gironda was one of bodybuilding's most influential — and unconventional — coaches. He believed the standard flat-and-wide bench press built a chest shape he considered unappealing: round and "shield-like," similar to a gladiator's breastplate. To build the sculpted, separated pec shape he wanted for his clients, he developed a specific dip technique now known simply as the Gironda dip.

💡 Key Fact: The exercise works primarily through a very wide bar grip combined with a deliberately rounded upper back — a very different setup from a standard triceps-focused dip.

Gironda Dips: Exercise Properties

Property Detail
Main Muscle Chest
Secondary Muscles Triceps, Shoulders
Equipment Wide parallel dip bars (bodyweight)
Exercise Type Compound, Push
Difficulty Intermediate to Advanced
Gironda dips wide bar hand positioning close-up

How to Perform Gironda Dips: Step-by-Step

Step 1: Set Your Grip

Use wide parallel bars set to roughly 33 inches apart — noticeably wider than a standard dip station. Grip firmly with arms nearly locked out, supporting your full bodyweight above the bars.

Step 2: Set Your Body Position

This is the detail most people get wrong. Elbows point wide and straight out to the sides — never tucked back. Head drops down with chin tucked to chest, and the upper back rounds forward. Feet stay under your face or slightly in front of it.

Step 3: Lower With Control

Dip down as far as your shoulder mobility comfortably allows, keeping the rounded, chin-down position throughout.

Step 4: Press Back Up

Return to the top, keeping elbows wide the entire time. Never let your elbows drift backward — this shifts tension away from the chest and onto the triceps, defeating the purpose of the exercise.

3 Gironda Dip Variations

Gironda dips low position pec isolation variation

1. Wide Parallel Dips

The classic version described above. Wide grip, round upper back, chin on chest, elbows straight out to the sides, feet together and pointed down under your face. Produces a sharp line of separation under the pecs that's hard to achieve with other exercises.

2. Low-Position Partial Dips

Performed on a slightly narrower (32-inch) parallel bar in a crescent body position — head down, back rounded, chest concave, elbows at right angles. Gironda considered the bottom portion of the movement (the first 12 inches from a hanging position) the most valuable part for pec isolation. If you can't complete a full rep yet, this partial range alone is enough. Try 3 sets of 12 reps.

3. V-Bar Half Dips

Using a 32-inch grip facing the V-end of dip bars, with back rounded and toes pointed to the floor, press from the low position up to where your upper arms are horizontal to the floor, then return. Add a weight belt for extra resistance once bodyweight becomes easy.

Gironda dips V-bar variation with weight belt

Chest vs. Triceps: How Emphasis Changes

Dips can shift between a chest exercise and a triceps exercise based on body angle. The more you lean forward and round the back (the Gironda style), the more the chest takes over. The more upright and elbows-tucked your position, the more triceps get involved.

Tips & Safety

No spotter needed, but helpful: If you don't have the strength yet, ask a training partner to support your legs, or use an assisted-dip machine.
Progressive overload: Once bodyweight dips feel easy, add a weight belt to keep progressing.
Shoulder health first: If you feel pinching or sharp pain in the front of the shoulder, reduce your range of motion or skip this variation.

Frequently Asked Questions (FAQ)

What makes Gironda dips different from regular dips?

A wider bar grip (around 33 inches), a deliberately rounded upper back, and chin tucked to chest throughout — designed specifically to isolate the chest rather than the triceps.

Are Gironda dips safe for beginners?

They're better suited to lifters with some dip experience and healthy shoulder mobility. Beginners should master standard dips first, then progress to the wider Gironda grip.

Do Gironda dips work the triceps at all?

They're a secondary mover here rather than the focus. Keeping elbows wide (not tucked back) is what keeps the emphasis on the chest instead of the triceps.

How many sets and reps should I do?

For the partial low-position variation, Gironda recommended 3 sets of 12 reps. For full-range wide dips, 3-4 sets of 8-12 reps works well for most lifters.

Related Articles

See more ...

Gironda Dips: The Complete Guide to Vince Gironda's Chest-Sculpting Technique

How to Do a Pull-Up: The Complete 2026 Technique Guide (From Zero to Your First Rep)

Last Updated: September 2026 | Reading Time: 9 minutes

How to do a pull-up - complete technique guide

Quick Answer: A pull-up is a compound bodyweight exercise where you hang from a bar with an overhand grip and pull your chin above it. It builds your back, biceps, shoulders, and core all at once. Most beginners need 4-8 weeks of targeted practice to get their first strict rep — this guide shows you exactly how.

Why the Pull-Up Is One of the Best Exercises You Can Do

The pull-up is a true test of relative strength — how much of your own bodyweight you can move. Unlike machines that isolate one muscle, a pull-up recruits your lats, biceps, rear delts, forearms, and core in a single coordinated movement. It needs zero equipment beyond a bar, which makes it one of the most accessible exercises in existence.

💡 Key Fact: Only around 1 in 5 adults can perform a single strict pull-up on their first attempt without training. If you can't do one yet, you're in good company — and this is completely fixable with the right progression.

Muscles Worked During a Pull-Up

Muscle Group Role
Latissimus Dorsi Primary mover — pulls your body upward
Biceps & Forearms Elbow flexion and grip endurance
Rear Deltoids Shoulder stabilization
Core (abs + obliques) Prevents your legs from swinging

Perfect Pull-Up Technique: Step-by-Step

Step 1: The Dead Hang

Grip the bar slightly wider than shoulder-width, palms facing away from you. Hang with fully extended arms and relaxed shoulders. This is your starting and ending position for every rep.

Step 2: Engage Your Shoulder Blades

Before pulling, pull your shoulder blades down and back ("packing" the shoulders). This protects your shoulder joint and creates a stronger base of pull.

Step 3: Pull With Your Elbows, Not Your Hands

Drive your elbows down toward your hips rather than thinking about pulling with your hands. This cue automatically activates your lats instead of over-relying on your biceps.

Step 4: Chin Over the Bar

Continue pulling until your chin clears the bar. Avoid jerking your head forward to "cheat" the range of motion — keep your torso upright throughout.

Step 5: Controlled Descent

Lower yourself slowly to a full dead hang. The eccentric (lowering) portion is where a large part of your strength gains actually happen — don't just drop.

Can't Do a Pull-Up Yet? Follow This Progression

Level Exercise Goal Before Progressing
1 Dead hang Hold 30-45 seconds
2 Negative pull-ups (jump to top, lower slowly) 5 reps of 5-second descent
3 Band-assisted pull-ups 3 sets of 8 reps with light band
4 Inverted rows 3 sets of 12 reps
5 Strict pull-up attempts 1 clean rep

5 Common Pull-Up Mistakes (and How to Fix Them)

Swinging or kipping: Using momentum instead of strength. Fix: slow down and control the dead hang before each rep.
Partial range of motion: Not reaching a full hang or full chin-over-bar. Fix: film yourself from the side to check your range.
Shrugging shoulders up to your ears: Loses tension and risks injury. Fix: "pack" your shoulders down before pulling.
Training pull-ups every day: Your back needs recovery time. Fix: train pull-ups 2-3 times per week, not daily.
Ignoring grip strength: Weak forearms fail before your back does. Fix: add dead hangs and farmer's carries to your routine.

Pull-Up Variations to Keep Progressing

Wide-grip pull-up: Places more emphasis on the outer lats
Chin-up (underhand grip): Shifts more work to the biceps — often easier for beginners
Neutral-grip pull-up: Easier on the shoulders and wrists
Weighted pull-up: Add a dip belt once you can do 8-10 clean bodyweight reps
Archer pull-up: An advanced unilateral variation that builds serious strength on one side at a time

Sample Weekly Pull-Up Training Plan

Day Focus
Monday 3 sets to near-failure (or progression exercise from the table above)
Wednesday Grip work + dead hangs + light volume
Friday 3 sets to near-failure, aim to beat last Monday's reps

Frequently Asked Questions (FAQ)

How long does it take to do your first pull-up?

Most complete beginners following a structured progression (like the table above) get their first strict rep within 4-8 weeks of consistent training, 2-3 sessions per week.

Are chin-ups or pull-ups better for beginners?

Chin-ups (underhand grip) recruit more biceps and are usually slightly easier, making them a good entry point if a strict pull-up feels out of reach.

How many pull-ups should a beginner be able to do?

One clean rep is a solid milestone. Reaching 5-8 clean reps is considered a good beginner-to-intermediate benchmark.

Can I do pull-ups every day?

It's better to train 2-3 times per week with rest days between sessions, since your back and biceps need recovery time to grow stronger.

Do pull-ups build a bigger back?

Yes — pull-ups are one of the most effective exercises for building lat width, which contributes directly to the "V-taper" look many lifters aim for.

Related Articles

How to Do a Pull-Up (The Complete 2026 Technique Guide)

Strengthen the chest muscle and Developed to the smith machine 


Developed to the smith machine

Developed coated Smith Machine


Strengthen the chest muscle and Developed to the smith machine
إضافة تسمية توضيحية


Strengthen the chest muscle and Developed to the smith machine 


The bench press with the smith machine is a variant of the classic bench press which is practiced thanks to a guided frame. This frame has the advantage of securing the movement and therefore of limiting accidents. But, it also allows for better focus on pectoral work, to dispense with partner and work heavy and / or failure.


On the other hand, the disadvantage when practicing the bench press with the guided frame is that the movement is less natural than with a free bar and that it is not suitable for all morphologies. Moreover, the work is less complete and leaves the muscles stabilizing, which develops less the overall strength.

Muscles used

The muscles required by the bench press to the smith machine are the same as those which are developed by the bench press at the free bar, that is to say the pectorals, mainly, but also the front of the shoulders (the deltoids and the triceps. However, stabilizing muscles, such as serratus, are less used than with a free bar.

Execution of the exercise

The performance is very similar to a developed lying at the helm. Place a bench under the guided bar. Load it with the right weight. Then lie on the bench, head under the bar, with back, buttocks, shoulders and head tacked against the bench. Your feet should rest on the floor, legs at 90 degrees.

Grasp the guided bar with a slightly larger hand gap than the shoulder gap. Your hands are in pronation, so the back of your hands is turned in your direction.

Lift the bar from its safety and control its descent to the middle of your chest. Then, return to the starting position by pushing the bar. Repeat until the end of the series and lock the bar again.
Breathing

Inspire when the bar descends and exhale when pushing it up. If you use a really heavy load, it is possible to block your breathing during the most difficult phase of the exercise.

Safety instructions

At any time of your movement, it is possible to lock the bar on the frame, usually by pivoting the cuffs forward. So, no risk of getting stuck under the bar as at the coated bar.

As with any guided machine, the movement may not be adapted to your morphology. If you experience discomfort or pain, you do not need to worry, think about practicing bench press with dumbbells.

Work at the bench press must be done in full amplitude. However, it is not necessarily necessary to lower the bar too low, especially if you have long arms, as this could over-stretch your pectorals.

Tips for the bench press at the Smith machine

To keep the back well tacked against the bench, it is possible to bend the legs and lay them on the bench. However, this reduces the stability of the position.

In order to carry most of the work on the pectorals, it is important to keep the shoulders against the bench by tightening the shoulder blades. Thus, the front will be less solicited.

Developed coated Smith Machine

The work at the smith machine is particularly interesting to work heavy, to failure or declining, because it is secure. Do not hesitate to take advantage of it.

You can stop at the end of the movement, just before you lock the joints of the elbows, in order to concentrate the tension on your pectorals.

variants

The bench press can also be practiced with a wide grip, in order to better solicit the pecs, especially their external part, or in tight grip in order to emphasize the triceps and the internal part of the pectorals.

It is also possible to use a sloping bench to emphasize the top of the pecs, or declined, to work primarily on the lower of these muscles.

The other direct alternatives to the developed recumbent to the smith machine are the bench press to the free bar or to the dumbbells. These two variants can also be used in inclined or declined versions.

Finally, the work of the pectorals can also be practiced with pumps, dips, lying apart or exercises as the pulley apart opposite.
Share the article!
Read more ...

Strengthen the chest muscle and Developed to the smith machine

Strengthen the chest muscles by sitting on the device


Developed seated at the machine
Developed seated machine


Developed seated at the machine Developed seated machine
إضافة تسمية توضيحية


Strengthen the chest muscles by sitting on the device


The machine-seated machine or "pectoral press" is an alternative to the coated barbell or dumbbell, which has the advantage of being secure and therefore allowing a heavier work.


It is less traumatic for the joints and the back. Moreover, on the right machines, whose trajectory is convergent, the movement is more natural than with a bar and is close to dumbbell work without its dangers of instability.

However, like all machine exercises, the movement may not be suitable for certain morphologies and does not help to develop the stabilizing muscles.

Muscles used

The developed seated machine mainly targets the muscles of the pectorals, the anterior beams of the shoulders and the triceps. Secondary, this exercise also solicits the trapezius, the latissimus dorsi, the large round and the biceps.

Depending on the height adjustment of the seat, emphasis can be placed on different areas of the pectorals. By adjusting it low, the top of the pectorals will resume a greater load. Conversely, by adjusting it above, the bottom of the pecs will be more stressed.

Execution of the exercise


Adjust the seat to your liking. Then, sit on the seat, back against the back. Grasp the wrists with the hands in pronation. Push the wrists forward without removing the back of the backrest until your arms are stretched.

Mark a stop for at least one second, then check the wrists until you return to the starting position. Repeat until the end of your series.
Breathing

The best way to breathe is to blow when you push the wrists and inspire on the back movement. When the load is very heavy, it is possible to block breathing during the most difficult phase of the movement.

Safety instructions


The developed seated machine is a very safe exercise. But, if your morphology does not seem to fit the machine, because of pain or discomfort, it is useless to get hooked. Better then use dumbbells.

Be careful not to go too far during the return movement. The muscles must work in full amplitude, but it is not recommended to stretch the pectorals too much as this can increase the risk of injury. This is especially true for practitioners whose arms are long and whose rib cage is narrow.

Tips for the developed seated machine

Be sure to keep the shoulders back, or even tighten the shoulder blades, so as to target the pectorals and not the front of the shoulders. To increase the stress on these muscles, be sure to contract the pecs at the end of the movement.

As the machine is secure, do not hesitate to work heavy, fail or even declining.

variants

Some developed machines can vary the sockets. It is then possible to work with a wide grip, which emphasizes the outside of the pectorals, a medium grip, or a tight grip that emphasizes the inside of the pectorals.

Developed seated Pulley machine

Other machines give the possibility of working in neutral grip, which more stresses the front of the shoulders. It is also possible to do the exercise on a bench with 2 pulleys.
Share the article!
Read more ...

Strengthen the chest muscles by sitting on the device (PECTORAL)

Strengthen the chest muscle with Gironda-style dips

Gironda-style dips

Gironda-style dips

Vince Gironda is a 50s bodybuilder, considered at the time as one of the best bodybuilding coaches. Nicknamed the "Iron Guru", he has trained and brought to the victory of many athletes, the best known of which is Larry Scott.
Many bodybuilding stars have trained in his gym like Lou Ferrigno "the incredible Hulk", Frank Zane and even Arnold Schwarzenegger.
Gironda claimed to be able to get in shape anyone, and more quickly than anyone else. That is why the studios sent her actors and actresses. Clint Eastwood, Denzel Washington, Dear and many others sweated in his gym
Vince had unorthodox training methods. For him, the bench press was an unattractive weight-training exercise, which produced unattractive breasts in the shape of a woman's breast; not broad and flat like a gladiator's cuirass.
To do this, he had his students dips in a very special way, the famous "dips Gironda", in order to obtain pectorals with a classical form.

Execution of the exercise

According to Vince Gironda, it is necessary to use parallel bars or a V-Bar, with a width of 33 inches (84 cm). If the gap is wider or tighter, it will not have the desired effect.

The most important factor to make good movement is in the elbows; they should be well apart and away from the shoulders. The back should be rounded and curved. The head should lean forward with the chin resting on the top of the chest.
instructions
It is recommended to cross the feet, making sure they are advanced and aligned with the face, and not placed backwards like the traditional dips.
The working position should not be changed, the purpose of which is to work the pectorals and limit the action of the triceps and shoulders. Indeed, bringing the elbows closer would require more triceps.
Then we have only to let ourselves go down by feeling the stretching of the muscles of the chest, and to ascend by contracting strongly the pectorals at the top of the movement.
Few people do this well. There is a tendency to accelerate the movement, where it is necessary to take the time to descend well, elbows well open, and to go back to the strength of the pecs.

shared
See more ...

Strengthen the chest muscle with Gironda-style dips

Strengthen the chest muscle Pectoral exercise Dive Bomber Pumps  Dive bomber push-up


Dive Bomber Pumps

Dive bomber push-up

Dive Bomber Pumps  Dive bomber push-up


A lot of things have been written about pumps, and you probably know all the variations of this exercise especially if you are a follower of body weight movements. Pumps are one of the best bodybuilding exercises to remodel the muscles of the bust without requiring any equipment.

Today we offer you a variant of the most difficult to execute: the dive bomber push-up! This variant is often incorporated into the military training of elite soldiers, such as the Navy Seals or the US Army Rangers. Maybe you remember Demi Moore doing this type of pumps in the film "At Equal Arms" (G.I. Jane).

This movement will allow you to develop the upper body strength while holding the trunk muscles. Unlike other types of pumps where most stabilizing muscles are kept static during movement, dive bomber pumps require dynamic work of flexions and extensions that will strengthen the joints (tendons and ligaments).

Targeted muscles

The "dive bomber push-ups" make it possible to work the whole body in one exercise and mainly solicit the chest, arms, abdominals, back and legs. In addition to the cladding work, the movement also helps to improve the flexibility of the thigh, back and shoulders.

Execution of the exercise

The trick to make the move well is to do it slowly, keeping control both during the descent phase to the ground and when returning to the starting position. It is also important to go back and forth using the same course, while trying to keep the body as close to the ground as possible.
In the starting position, the legs are widely separated and the hands spaced a distance corresponding to the width of the shoulders. Bring the head between the biceps and push the buttocks back with the heels on the ground. Try to keep your back as straight as possible. For the less flexible, it may be necessary to stretch the thighs and the shoulder joint before doing the exercise.

Lower the head and chest by bringing the torso parallel to the ground and then back up as if you were trying to pass under a bar. In the final position, your arms should be stretched, your hips close to the ground and your head in the air, looking parallel to the ground. Return to the starting position by doing exactly the opposite way.
Read more ...

Strengthen the chest muscle Pectoral exercise Dive Bomber Pumps Dive bomber push-up

Pectoral. chest. muscle exercise Pec Deck

Pec Deck


Pectoral. chest. muscle exercise Pec Deck

This weight training exercise solicits the pectorals. It is an insulation exercise that allows to work on a large amplitude. Very popular with beginners, the "butterfly" usually completes the pectoral session after the basic movements. If you work in long series, it will give you very good sensations and intense congestion.

It also has the advantage of bringing a constant resistance compared to dumbbells which can be interesting to properly solicit the inside of the pecs when the arms are against each other.

Targeted muscles

The large and small pectoral, anterior deltoid, brachial caraco and the large serratus. It touches both the upper and lower part of the pectoralis major.

The muscular sensations are carried on the external part when the arms are brought back and on the internal (sternal) part when the arms are tightly pressed together.

On this movement there is a horizontal adduction of the arms (close to each other) under the action of the pectoral major, anterior deltoid and brachial coraco. At the same time the scapula moves away from the column under the action of the small pectoral and the large serratus to allow the arm to move well in the front.

Execution of the exercise

Start by first adjusting the height of the seat so that the shoulder and elbow joints form a right angle (90 °). Sit upright by sticking the lumbar against the backrest. Grasp the wrists and place the forearm against the supports. The easiest way is to grab a handle, bring it to yourself and then grasp the other handle. This avoids being torn apart. The knees are bent and the feet flat on the ground, spread apart from shoulder width. Bring the wrists against each other while exhaling. Return to starting position.
Breathing

Inspire the handles away from each other. Exhale by bringing the handles together against each other during the concentric phase.

Safety instructions

The elbows should not be too far back when you return to the starting position, this strongly stresses the joint of the shoulder. Limit amplitude according to your flexibility.

The back must rest against the backrest. Perform the movement in a slow and controlled way to feel the work of the pecs.

variants

Some muscle-building machines keep the arms parallel to the floor (arms taut, elbows slightly bent), an exercise equivalent to dumbbells lying dumbbells but on machine.
Read more ...

Pectoral chest muscle exercise Pec Deck

Featured post

Intermittent Fasting for Beginners: The Complete 2026 Guide to Lose Fat and Build Muscle

Last Updated: September 2026 | Reading Time: 12 minutes | Expert Reviewed Quick Answer: Intermittent fasting (IF) is an e...

Search This Blog

Ad Home

Breaking

Random Posts

Recent Posts

Contributors

Followers

Recent News

About Me

We share practical, easy-to-follow fitness and nutrition guides to help you train smarter, eat better, and reach your goals — one workout at a time.

Comment

Popular Posts